
Advice and News •

You’ve sweltered your way through balmy Brisbane summers and shivered during a particularly frosty Westlake winter, deciding to finally install air conditioning in your home. Now, you’re staring blankly at your AC remote, wondering what all those tiny icons mean. You’re not alone! AC remote symbols vary slightly between brands like Fujitsu, Mitsubishi, and Daikin, yet most brand models share similar features. The trick to operating your new AC like a pro is in understanding the basic functionality settings on your remote.
In this guide, the Technicool team breaks down the most common AC remote symbols, explaining how to use them effectively to help save you time, energy, and avoid a minor meltdown, so you can get the most out of your air conditioning system.
Confused by AC Remote Symbols? Here’s What They Mean
Knowing each symbol’s function isn’t just about pressing the right button — it’s about improving comfort and efficiency. Using the wrong mode on your remote can cause your system to work harder than necessary, resulting in higher power bills and less reliable performance.
With so many makes and models on the market, this guide helps decode the most common mode AC remote symbols’ meaning across trusted brands, so you can confidently control your climate.
- Cool Mode – A snowflake icon that activates cooling. Perfect for sizzling Brisbane summers.
- Heat Mode – A sun symbol that switches your system into heating mode.
- Dry Mode – Water droplets icon for dehumidifying the air, great when the barometer goes down.
- Fan Mode – A fan symbol that circulates air without heating or cooling.
- Auto Mode – Arrows forming a loop, allowing the unit to self-adjust based on room temp.
- Quiet/Silent Mode – A speaker with a slash to minimise noise.
- Sleep Mode – Moon or Zzz icon, for gradual temp changes during the night.
- Turbo/Powerful Mode – Often represented by a rocket or flame, this mode quickly ramps temps up or down.
- Swing Mode – Vertical or horizontal arrows for controlling louvre movement.
- Lock/Child Lock – Padlock icon to prevent accidental changes.
These symbols may appear on-screen, as physical buttons, or both, depending on your model.
Getting Started: Before You Use Your AC Remote
Before operating your air conditioner remote, regardless of the brand, there are a few steps to take:
- Insert batteries into the remote control (typically AAA).
- Mount the remote control holder on the wall for easy access.
- Aim the remote directly at the indoor unit when using it — the signal transmitter needs a clear line of sight to the unit.
- If the signal is blocked, the unit might not respond.
- Like all AC remotes, avoid getting it wet or dropping it — they’re tough, but not indestructible.
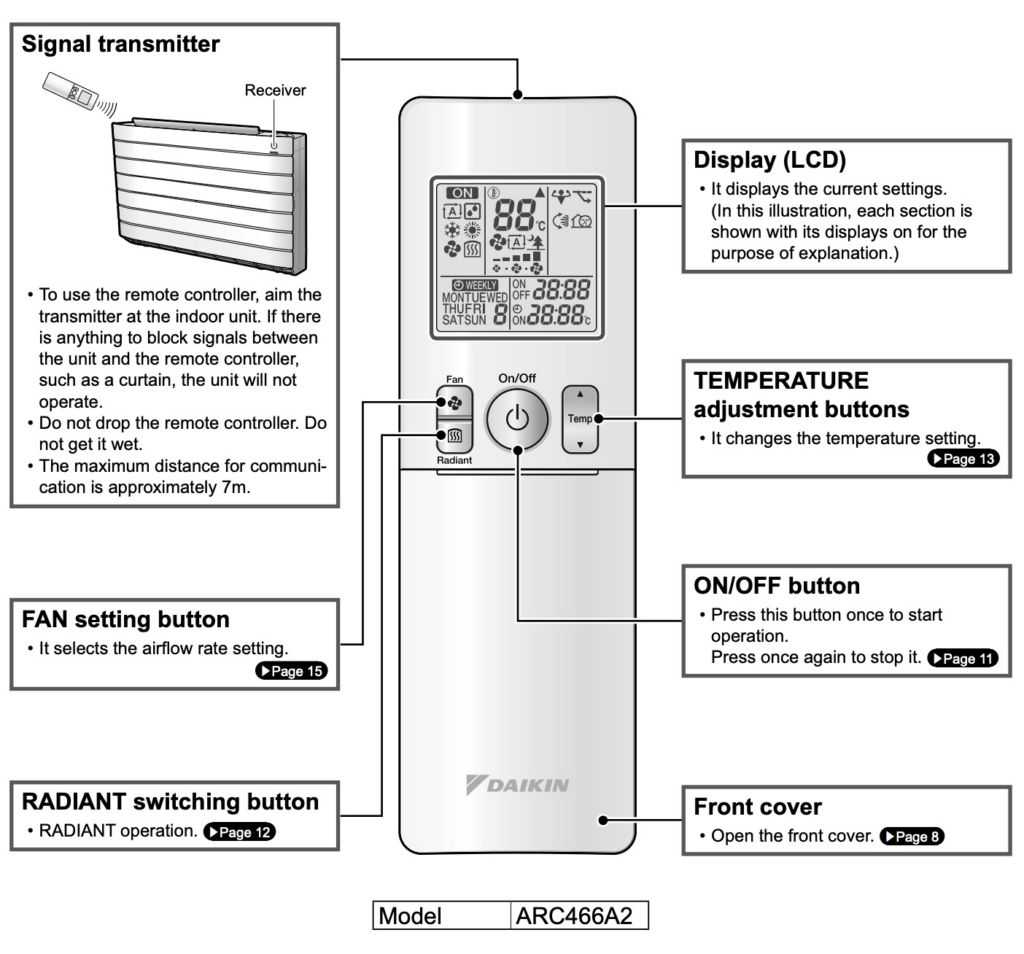
Daikin AC Remote Symbols: ARC466A2 Quick Guide
This section covers a few essentials for using Daikin’s basic split system remotes, particularly the ARC466A2 model — one of the more common Daikin controllers found in Aussie homes.
For full details, refer to your specific model’s operation manual, or search for your Daikin AC remote model on the brand website.
Deciphering Your Daikin Air Con Remote
The ARC466A2 Daikin remote includes a range of clearly labelled buttons and display features and has two main control panels:
- The main (exterior) control face displays standard options like mode, temperature, and fan speed.
- There’s also a secondary (interior) panel, which you can access by sliding the lower section of the remote downward. This reveals more advanced settings and timers.
Remote control layouts vary slightly across Daikin models, so the symbols on your Daikin AC remote may look a little different to what’s online. Daikin manuals usually include a detailed diagram of all remote functions. If you’re unsure, contact our Technicool team for help interpreting the Daikin AC remote symbols.
FAN Setting Button
This symbol adjusts the airflow rate of your unit. Often represented by a fan icon on most Daikin AC remote controls.
RADIANT Switching Button
One of the more specialised Daikin AC remote symbols, this button activates quiet, current-less heating through the radiant panel. The panel warms up and radiates heat into the room, creating a gentle and even warmth. It works in addition to the HEAT mode, offering an alternative to the standard fan-driven heating.
LCD Display
The LCD screen shows current settings, including temperature, mode, and fan speed. Understanding the meaning of your mode AC remote symbols can help you quickly identify what setting you’re using just by glancing at the display.
TEMPERATURE Adjustment Buttons
Use the “up” 🔼 and “down” 🔽 arrows to increase or decrease your set temperature.
- COOL mode ranges from 18–32ºC
- HEAT or RADIANT modes range from 10–30ºC
- AUTO mode ranges from 18–32ºC
For optimal efficiency and comfort, aim for a temperature range of 26–28°C in summer and 20–24°C in winter. Getting familiar with the Daikin AC remote symbols for temp and mode controls helps reduce energy use.
ON/OFF Button
Press this button once to power your unit on and again to turn it off. It’s one of the simplest but most important Daikin AC remote symbols you’ll use every day.
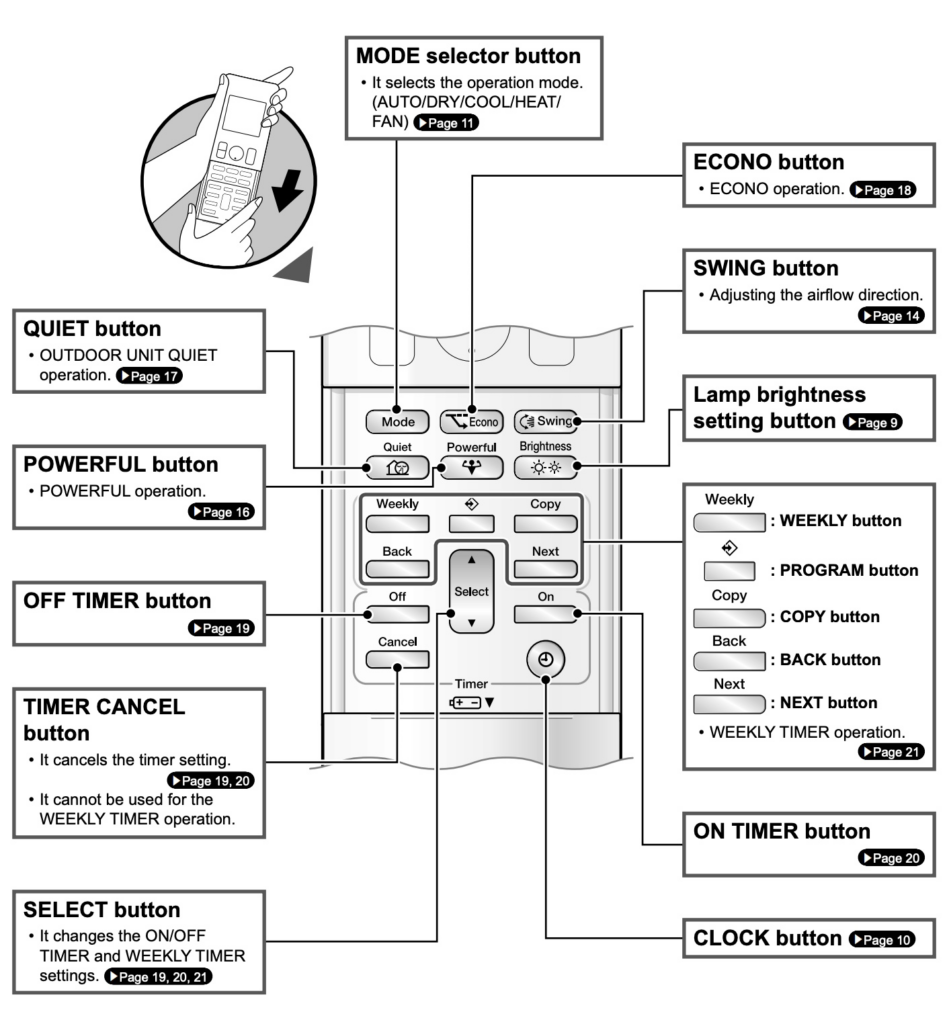
Daikin Interior Face Remote Control functions
Many Daikin customers have likely stared at the remote control and thought, “What on earth do all those Daikin AC remote symbols mean?”. We’ve provided a breakdown of each function on the interior control face of your Daikin air conditioner remote to help you make the most of every mode and setting.
MODE selector Button
The MODE selector lets you choose the operating mode of your system. Once set, your Daikin air conditioner will remember and continue operating in that same mode until changed.
Standard operation modes include:
- HEAT – Extracts warmth from outside air to heat your room. Colder conditions may reduce heating performance, and defrosting mode may activate automatically when needed.
- COOL – Transfers indoor heat outside to cool the room. Avoid using COOL mode if outdoor temps drop below 10ºC to prevent system errors.
- DRY – Reduces humidity in the air while maintaining a stable temperature.
- AUTO – The system automatically selects HEAT or COOL based on indoor and outdoor temperatures.
- FAN – Circulates air without heating or cooling.
QUIET button
Reduces the noise of the outdoor unit by lowering fan speed and frequency. Ideal for night-time operation.
POWERFUL Button
Maximises cooling or heating performance in any selected mode for rapid temperature adjustment. A handy feature when you need immediate comfort.
OFF TIMER Button
Allows you to set a timer to turn off the air conditioner at a chosen time. Perfect for overnight use or energy-saving schedules.
TIMER CANCEL Button
Cancels any active timer setting. (Note: This button doesn’t cancel the WEEKLY TIMER program.)
SELECT Button
Use this to cycle through the ON/OFF TIMER or WEEKLY TIMER options.
ECONO Button
This symbol activates ECONO mode, which limits power consumption. Practical for when other high-power devices are running simultaneously.
SWING Button
Pressing this adjusts the horizontal airflow direction. Hit it once to start swinging the blade, and again to stop it at your preferred angle.
LAMP BRIGHTNESS Button
Lets you dim or brighten the indoor unit’s display panel, depending on your preference or lighting conditions.
WEEKLY/PROGRAM/COPY/BACK/NEXT Button
These buttons help you customise the WEEKLY TIMER settings. You can store up to four timed operations per day (for each day of the week) to suit your lifestyle.
ON TIMER Button
Sets a start time for your system to turn on automatically. Handy for early mornings before getting out of bed or returning home to a cooled or heated room.
CLOCK Button
Allows you to set the current day and time, ensuring all scheduled timers operate correctly.
By getting familiar with these Daikin AC remote symbols, you’ll be able to unlock all the functionality your unit has to offer. And once you understand each mode of the AC remote symbol’s meaning, it’s easier to create the perfect comfort level without messing up your split system.
How to Use a Fujitsu AC Remote: Functions & Symbols Explained
If you’re navigating the settings on your Fujitsu AC remote, this guide will be very helpful. We’ve broken down the key features for the ASTG18LVCC split system model — one of Fujitsu’s most popular units for mid-sized rooms. For specific instructions tailored to your unit, we recommend checking the operation manual or searching for your exact Fujitsu model.
Understanding your mode AC remote symbols helps you get the best performance out of your system and maintain energy efficiency throughout the year.

Fujitsu AC Remote Overview
The functions below correspond to the numbered diagram above on your remote control:
17. Signal Transmitter
Like most air conditioning systems, the Fujitsu AC remote requires a clear line of sight to the indoor unit. Obstructions can interrupt the signal, and remember — never drop or get your remote wet.
18. MODE Button
This button cycles through the operation modes: AUTO, COOL, DRY, FAN, and HEAT:
- COOL: Lowers the room temperature.
- HEAT: Warms the room with a short delay while the fan gradually increases speed.
- DRY: Gently cools and dehumidifies. The fan may pause intermittently. Don’t use for heating.
- FAN: Circulates room air without cooling or heating.
- AUTO: Starts on low fan speed, then automatically selects the best mode based on the room’s conditions.
19. 10ºC HEAT Button
Maintains a minimum temperature of 10ºC to prevent the room temp from dropping too much in winter.
20. SET TEMP Button
Adjust the thermostat with the up/down 🔼 🔽 arrows:
- AUTO: 18–30ºC
- HEATING: 16–30ºC
- COOLING/DRY: 18–30ºC
- Temperature cannot be adjusted in FAN mode.
21. ECONOMY Button
Enables energy-saving operation by adjusting the thermostat based on ambient temperature, reducing unnecessary power usage.
22. SLEEP Button
Customise sleep mode by setting a timer via the TIMER SET buttons (button 28). This feature gradually adjusts the temperature overnight to avoid overcooling or overheating, then shuts off automatically.
23. TIMER MODE Button
Use this for setting automatic ON/OFF times. After pressing the START/STOP (button 25), press TIMER MODE to cycle between ON and OFF timer options. Adjust using button 28.
24. FAN Button
Set the fan speed: AUTO, HIGH, MED, LOW, or QUIET.
- In HEAT mode: The fan circulates warm air efficiently.
- In COOL mode: As the room nears the set thermostat temp, the fan slows.
- In QUIET mode: Minimises noise, with slightly reduced heating/cooling power.
25. START/STOP Button
Press to begin or end AC operation.
26. SET Button
Changes the vertical (up/down) airflow direction. Horizontal airflow must be adjusted manually. Press repeatedly to find your preferred angle.
27. SWING Button
Activates automatic swing of the airflow direction louvres for better room circulation.
28. TIMER SET Buttons
Use in combination with TIMER MODE and CLOCK ADJUST buttons to program operation times.
29. CLOCK ADJUST Button
Use a pen tip or paper clip to press this button. Set the time using button 28, then press CLOCK ADJUST again to confirm.
30. TEST RUN Button
Only used during system installation. Avoid using in everyday operation.
31. RESET Button
Use this to reset your Fujitsu AC remote if you’re experiencing functionality issues. By learning your Fujitsu AC remote inside and out — and especially understanding the mode AC remote symbols’ meaning — you’ll get more efficient, comfortable performance out of your air conditioner all year round.
Need help to choose the right system or with maintaining advice? Contact the Technicool team — our Brisbane air conditioning experts are here to assist with reliable, professional advice for home and business needs.
How to control your air conditioner remote: Mitsubishi Electric
Like other models, when using a Mitsubishi AC remote, specifically from the MSZ-AP22-50 Series, understanding what all the buttons and symbols do will impact your comfort and energy bills. These models come with a range of standard features, but the remote’s layout and symbols can be a little confusing if you’re not familiar with them.
From fan speeds to vane direction, temperature control to ECONO COOL, this guide will help you with the basics. In the diagram below, we break down the Mitsubishi AC remote symbols so you can better understand what each one does, especially the MODE AC remote symbols meaning, which is key to switching between functions like heating, cooling, and dry mode.
Want more in-depth instructions, such as how to set the timer or adjust temperature settings? Head to the Mitsubishi Electric support page and scroll to the Guide and Manual Downloads section to find your model-specific manual.

Need Help Understanding Your AC Remote Symbols?
While Fujitsu, Daikin, and Mitsubishi are among the most common brands, other popular models like Panasonic, Samsung, and LG come with their own remote quirks. Panasonic remotes often highlight ECO and energy-saving features, while Samsung may include “Good Sleep” modes or smart icons (like cloud or Wi-Fi), and LG units sometimes feature an Auto Clean symbol — usually depicted as sparkles or a brush — to help maintain hygiene.
Most AC remotes share similar functions, but each brand may vary slightly, so it’s always worth checking your manual. If you’ve misplaced yours or you’re dealing with a lesser-known system, give the team at Technicool a call — we’re always happy to help decode AC remote symbols, no matter the brand.
If your remote isn’t working properly, it might not be the symbols — just a case of flat batteries, blocked signals, or buttons that need a clean. Technicool’s Brisbane-based air con technicians can help you troubleshoot, replace a faulty remote, or even recommend smarter AC usage like pairing Sleep mode with a timer or scheduling regular maintenance.
Whether you’re trying to interpret tricky mode AC remote symbols’ meaning, dealing with a particular brand, or just want peace of mind that your system is running efficiently, contact Technicool today. We’ll help you take control and stay comfy winter, summer, autumn and spring.
👉 Book a service or call for advice.
References
- 2023, Daikin Room Air Conditioner Operation Manual, Daikin
- 2023, Product Manuals, Fujitsu General